Log in |

Snow Anya

030001030002

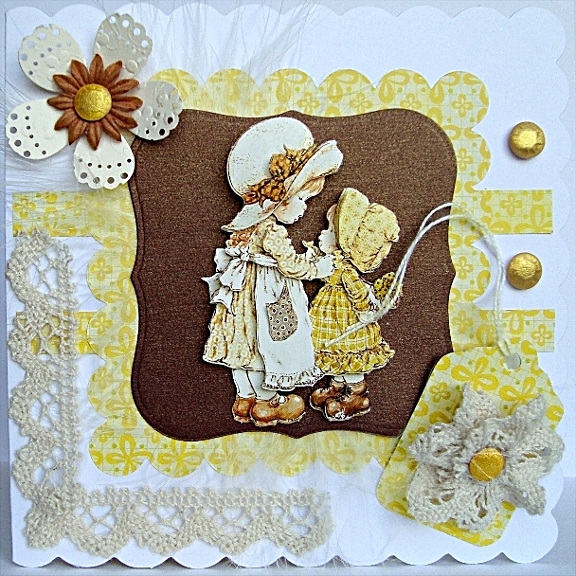
I teach card making classes twice a week, a Monday and Tuesday. This is the card we made on Monday (minus all the bling we never seem to have time to put these items on too much gossiping) but they finish when they get home – I hope.

The Monday night girls have all been making cards a lot longer than the Tuesday class so I teach more advanced classes on a Monday and the Tuesday girls are all very very new to card making and are only just starting to learn all the different techniques.

Rain, snow and shine are the latest stamps I have bought along with the Miss Anya Dressy set (bet you can’t guess what cards are going to be posted next).

This card is quite deceiving because it looks quite plain but there is a lot going on and that’s the reason why I took more photos so that you can see all the different elements. Stitching, matting and layering, bling, decoupage, stamping, nesties, snowflake punches, colouring in with copics, liquid pearls, gems, fluffy stuff and ribbon all make up this card.

Used a snowflake stitch all around the edge of the paper think it is from Papermania but not sure and obviously the girls didn’t stitch theirs but it shows them what they can do if they have a sewing machine at home. Made a nestie apperture through two layers of paper and one layer of card (bit of patience needed because you have to run through the big shot about four or five times to make sure it cuts). The off cuts of paper were then matted and layered onto the front and the inside of the aperture (waste not want not). Decoupaged the large stocking on the front of the card and added lots of stickles bling. Made a bow and dotted the punched snowflakes around the aperture, then added lots and lots of liquid pearls, just love these. Inside is covered with co-ordinating paper and Snow Anya was stamped onto plain white card and then cut out with another nestie. I coloured her in this time with Pro Markers, not my trusty water colour pencils, and added faux stitching around the edges. Fluffy stuff was added to her muffler and the edge of her coat which was then covered with a layer of stickles. She was positioned on the inside so you can see her when the aperture is opened. Punched snowflakes were also added. Season’s greetings was stamped onto the front of the aperture and added little gems in the corner which completed the card. I have to say all the cards at the end of the evening looked lovely.

Shirl
030003
030004030005

Laura’s Crop

010024

Thanks Laura for a fun time as usual and thanks Marie for all your hard work with the shop.

This is the card we made yesterday and hopefully will get a chance later to post the other tit bits we made as well.

Added more bling to the card last night, also fluffy stuff, liquid pearls and stickles. She is so adorable and we all coloured her in with different materials, some used Copics others used Pro markers but I used my faithful watercolour pencils… just love them. The papers we used are from the Magnolia range and they are just gorge (bought a couple yesterday couldn’t resist).

Shirl

Sarah Kay Decoupage

010023010022

We must be the proudest grandparents ever at the moment, our grandson Alex – 9 years of age – played football for Crookham Rovers every Saturday morning. He was asked to go for a trial at the Aldershot Football Ground and you’ve guessed it he got in, he is now playing for Aldershot. His Grandad supports Manchester United but his first love has always been Aldershot Football Town, ever since he was a little boy, so how proud do you think he is at the moment that Alex is playing for his team, absolutely cockahoop.

Now back to the card. I very rarely make decoupage cards anymore because the cutting out is too painful for my hands, but these new Sarah Kay decoupage are just so beautiful and extremely easy to do because they just pop out.

This card was the project for my Tuesday ladies. They all had different images, background papers and embellishments.

The second card I demonstrated along with them but I didn’t finish mine until this morning. Added some lace and stitching. The lace flower I also made and added to the tag instead of a sentiment. Just love feathers and thought it gave a nice touch to the background.

Again all went home with beautiful cards and lots of oohing and aahing followed them.

Shirl

Winter Sprite

010019

This really is a whimsical stamp from Stampendous so full of joy as the sentiment on the card says. Who wouldn’t want to receive this card at Christmas.

Entering this one for the Quixotic challenge #2 stitching

Image is stamped with Brilliance Pearlescent Rust and loads of gold liquid pearls dotted all around. Stamped image again onto cream cardstock with Versamark and then embossed with gold powder, cut out the middle snowflake and decoupaged onto original image. Oyster Dew Drops, gold stickles and little gold metal flowers were all added to the image.

Stamped Joy randomly around the picture because she really looks so happy

Cut the middle out of the paper and then added the vellum layer. Cut the centre from the vellum but left a large border, distressed the edges then inked with the Brilliance Pearlescent Rust. Stitched onto card with a very pretty decorative stitch.

Shirl

Royal Mail (with a twist)

010021

My ladies all made this card last night and I know I know before you all start shouting and screaming at me – pillar boxes are supposed to be red – noooo not here in the beautiful Emerald Isle they are green. Needless to say this card will not be winging it’s way to one of my buddies in the UK for Christmas but will be staying here in Ireland. Now now ladies put your hands down and stop saying… me me.

Back to the class, all my lovely ladies went home with such beautiful cards last night – their colouring techniques are really beginning to shine through and some very unique styles are starting to develop. Well done girls.

I chose the Royal Mail Penny Black stamp (always been addicted to these and if memory serves me well the first stamp I ever purchased was a PB) because they are so easy to use and not one of the girls stamped a bad image.

Going off on one now but it is pure coincidence that my beautiful Cocker Spaniel is called Penny Black. We bought her as one of our presents to each other for our 25th Wedding Anniversary and all the Grandchildren wanted to name her. Not even going to go there with some of the names they came up with. Anyway the name chosen was Penny and because of her colouring my husband added Black onto the end of her name. How spooky is that, one of my fave makers of stamps is the name of my dog, could be thought transference….The End.

Now lets get back to the card, very plain but oh so cute not a bit of DP anywhere…

(Off on one again, I had the idea of putting a glossary at the top of my blog for abbreviations, because blogging is a whole new world to me and I am sure there are new bloggers just like me out there who are in the dark with some of the terms used…. That is until I saw PMSL over on Tabby Craft Designs …(it’s a must to visit her blog today the card is just the prettiest)… which incidentally I did know what it meant and I also PMSL (try explaining that one cleanly) so my idea was squashed before it started… nice one Tab’s.)

…Try again – Cuttlebug Swiss dots was the main mat for the card and a red scalloped nestie. Image was stamped and embossed onto a nesti and the sentiment also sits on a nestie -Fancy Tags, green ribbon from stash, bit of Stickles bling for the scarf, white fluffy stuff for snow, not forgetting the obligatory candy tots and Bob’s your uncle one finished card.

BFN everyone, see you soon (couldn’t resist it)…

Shirl

Country Girl

010008

Sugar Nellie stamps are just fabulous this is the first one I ever bought.

Followed Challenge 23 – Judy’s sketch… well as close as possible… I always have problems in following sketches because I tend to drift off and do my own thing but I think this time I followed it quite closely.

Used Basic Grey paper pad, Sultry – inked edges with Rangers worn lipstick and stitched onto card. Stamped image with black StazOn and then cut her out. Used Faber-Castell water colour pencils to colour her in. Sat her on a nestie and surrounded her with dew drops.

Brad in the middle of the flower is from Papermania, married the centre of the brad with one of the papers.

Shirl

Come Fly With Me

010007

Going to enter this into the Paper Play Challenge – Parlez Vous – (use any other language apart from English) and also Lili of the Valley Challenge Blog.

Woops changed the title of my card because I am going to enter it into the Penny Black Saturday Challenge – Week 74 the criteria was to base your entry this week around a favourite Song Title or lyrics. Picked a famous song from Frank Sinatra. Wish I had put a musical note coming out of the little birds mouth… too late now.

Loved this paper, another download from Designer Digitals called Grungy Christmas.

Stitched edges with a holly stitch and then scratched both paper and stitches with a very fine sanding block. It actually made the stitches go very fussy which toned in well with the card.

Inked with various distressed inks and also stamped the Penny Black – Partridge in a Pear Tree – images with StazOn Saddle Brown.

Coloured images with Copics and added red Liquid Pearls. Red ribbon from stash.

Loved the overall effect and some lucky member of my family will be getting this for Christmas.

Shirl

A Time to Ponder

010006

My advice of the day – never make a card when you have a head cold. Started this card on Tuesday…. what’s today…. yeh that long, wish I had listened to my own advice.

She still looks adorable despite all the head pain when making her. Love the stitching around the edge of the blue and purple paper (Pink Petticoat), not sure how well you can see the garland stitch. Also added the same stitch around the setiment.

Did the paper piecing again and also the finishing touches with copic markers. Slight problem with the ink and the markers – my own fault can’t even blame the usual suspects (hubby and Penny) – used the StazOn ink pad instead of my Versafine, won’t do it again. The Copics and the ink bled into each other. Managed to get around most of the problem (wasn’t going to waste all that work).

Nestie cut out with purple core card and distressed, flower coloured in with Copic V06, dotted lots of petal pink Liquid Pearl and last but not least candy tots.

Feeling better today and can’t wait to get started.

Shirl

We meet Again

010005

Promised another card with this image on it and also the around the page fanned shell punch.

Miserable day here so had to take a picture of the card while light wasn’t too bad, might try again later because she looks so much better than the picture shows.

Have to go out at the moment will put more info about the card when I come back….

….Back again – stamped image with Black StazOn, no embossing this time. I tried something different with the image today… paper piecing, it’s something from my patchwork quilting and applique days. Enjoyed it so much will be doing again.

Stamped the image three times, once on white cardstock, second on the matching blue paper and third onto green paper. Cut out the bits from each piece of paper that I wanted and then matched to the image on white card. Proceeded to colour in with Copics and added Liquid Pearls. Cut out with nestie labels 4, distressed edges with Rangers ink – faded jeans and matted behind. I am quite a harsh critic with my work but this turned out great.

I wish you could see the flower better because there are 6 small little flowers in the centre, coloured the stems with copics and a dash of Liquid Pearls to finish. Papers from Pink Petticoat, and stitched onto card, bows, jewels and flowers from stash.

Please leave a comment and let me know what you think.

Shirl

Pretty in Pink

010004

My Martha Stewart around the page punches arrived this week – yummy or what – just had to try them out. I used the loop first and the next card will have the fanned shell on it. They add such a lovely element to your card.

Sweetheart Tilda is going into the Just Magnolia Monochrome Challenge. She was stamped with StazOn Cherry Pink onto the pale pink paper and then cut out. Stamped her a few times to try out colouring but she looked better in the flesh so to speak.

Papers were a download from Digital Scrapbook Pages. Flowers and leaves were punched from the same paper. Roses and beads were added to the middle of the flowers. I printed off a double sided piece of paper with the bright pink and the pale pink so I could fringe the edges. Tilda is sitting on a stamped image from Papermania and the edges were coloured with copic markers (tried to match the rose colour but didn’t quite manage it… another excuse to buy more).

Not a nestability in sight wow didn’t think I would make a card again without one.

Shirl