These are easy watercolour cards, been promising myself that I would make a couple of spare cards like Lauren’s Birthday card.

Her card is here which looks more CAS than this one.


You are currently browsing the archives for the Stampin Up category.
These are easy watercolour cards, been promising myself that I would make a couple of spare cards like Lauren’s Birthday card.
Her card is here which looks more CAS than this one.
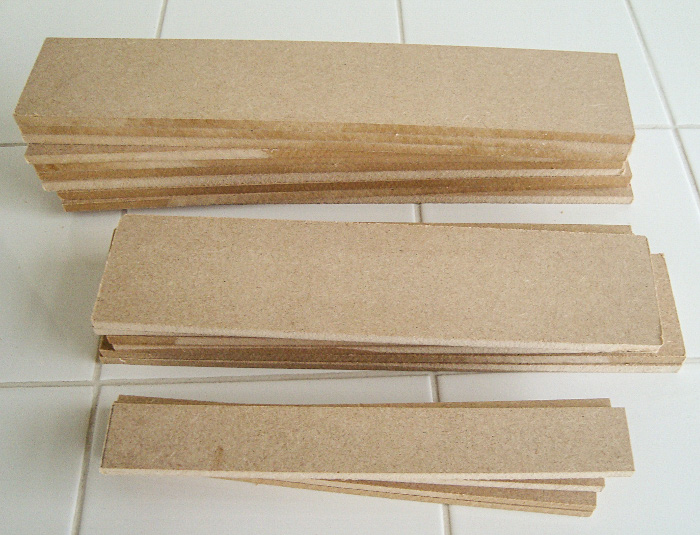
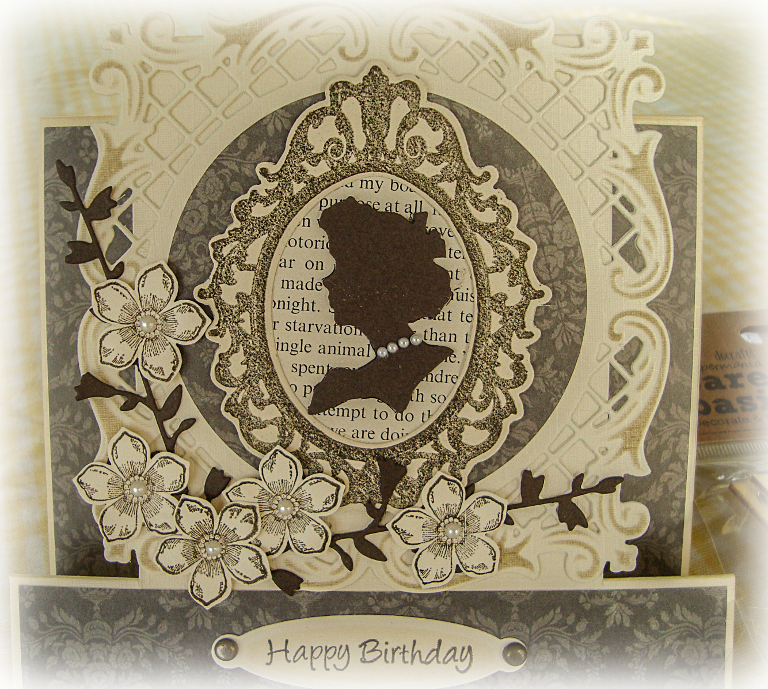
This plaque started life as reject MDF off cuts given to me by Crafty Friend, she was given them and then shared with me.
Now that’s what I call a friend, what do you think?
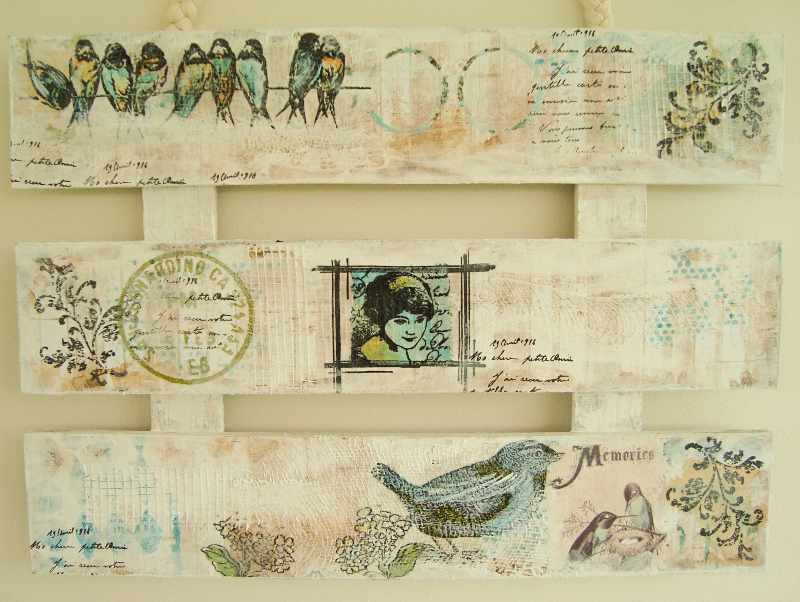
There have been no Saturday classes over the summer but last week saw the start of them again.
Because of one thing and another Phil was the only person who could make it and she didn’t mind having a one to one, below is what we made.
Slow start to the class because we were nattering, consequently we didn’t get it completed. Finally finished mine and well chuffed with how it turned out.
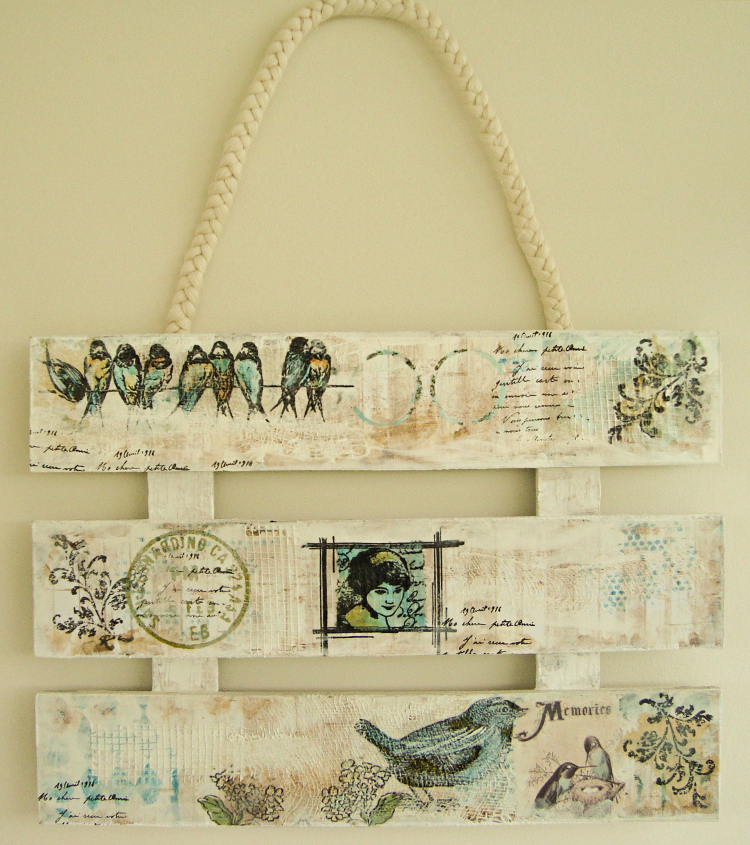
The Plaque is very dimensional and touchy feely, love it.
Used stamps from Inkylicious, Crafty Individuals, Stampin Up, PaperArtsy and a new one which I just bought by Seth Apter (that’s the frame in the middle).
Apart from the stamping I painted, stencilled, used paper napkins, builders mesh and gauze.
Also found some old twine which I plaited to make the hanger for the plaque.


I am entering this into the Craft Stamper Challenge which is Anything Goes.
FSC is delving into the underworld of the sea this month and it was the lovely Dani who picked the theme for this challenge.
As you can see the captain went down with his ship and things took a bit of a murky turn at the bottom of the ocean.
Poor Mr Terry-Turtle looks quite confused as to what happened and Miss Julie-Jellyfish can’t wait to get away.
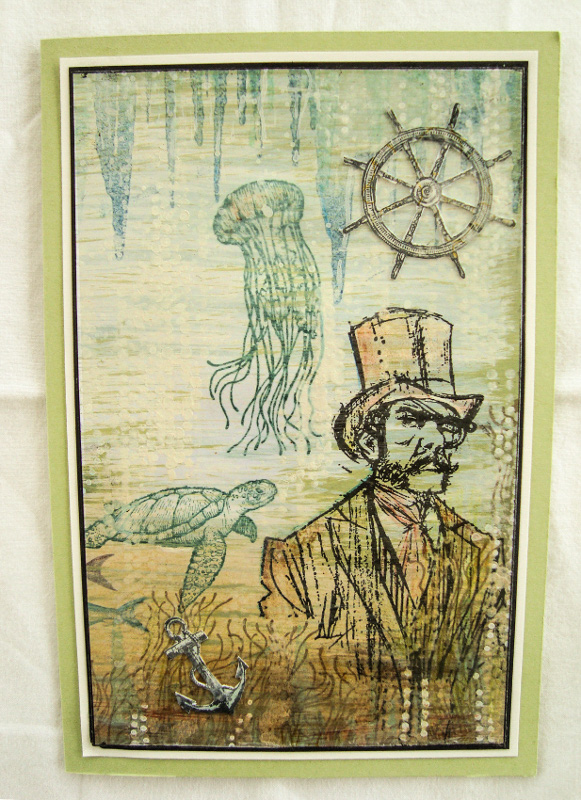
How sweet is that face … no, not the Captain … Terry-Turtle!!!! You can find him along with Julie-Jellyfish in the Stampin Up catalogue in a set called ‘From Land To Sea’.
The ships wheel is from the same set but the anchor is from another set called ‘The Open Sea’. Both were stamped and fussy cut before adding to the card.
Poor Julie-Jellyfish was also stamped upside down to give the illusion of plants on the ocean bed.

I would love it if you hopped on over to see all the DT’s work as they are simply stunning. Also don’t forget that the winner of this challenge has $20 to choose anything they like from Flonz’s store.
My youngest granddaughter Lauren starts a new journey on Friday as she becomes a teenager.
The biggest part of missing out on Lauren’s growing up is keeping abreast of how her personality has changed and how her creative style in life has done a complete turn around.
Whereas Claire, Amber and I love the messy, inky and busy side of crafting Lauren, to my complete surprise, has gone more like her Dad and loves the CAS look.
Lauren and a girlfriend of hers came to Ally Pally with us this year and they loved it. Flitting about the huge hall like butterflies they were in their element. Hardly saw them at all during the day. We eventually stopped for lunch and they showed us what they had made at one of the make and takes.
On the Sunday after Ally Pally Lauren, friend and myself made an album. Mine was pretty with lots of embellishments on it, her friend’s was like a pizza with everything added but Lauren’s was very stark and minimalistic.
This was when I realized that her developing creative style is so different to mine, Claire’s and Amber’s.
Way to go Lauren, be unique and make your own path sweetie.
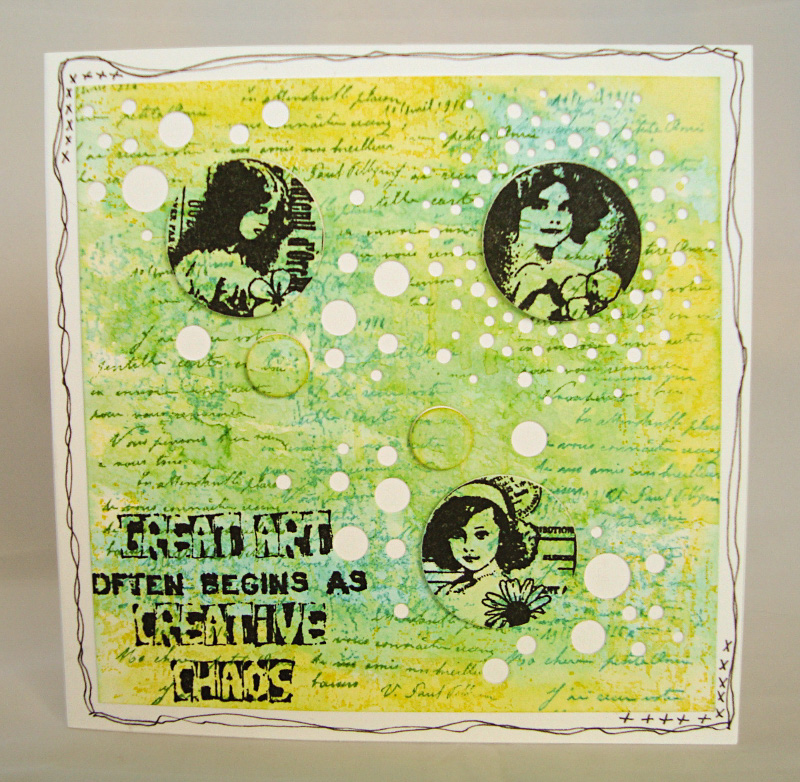
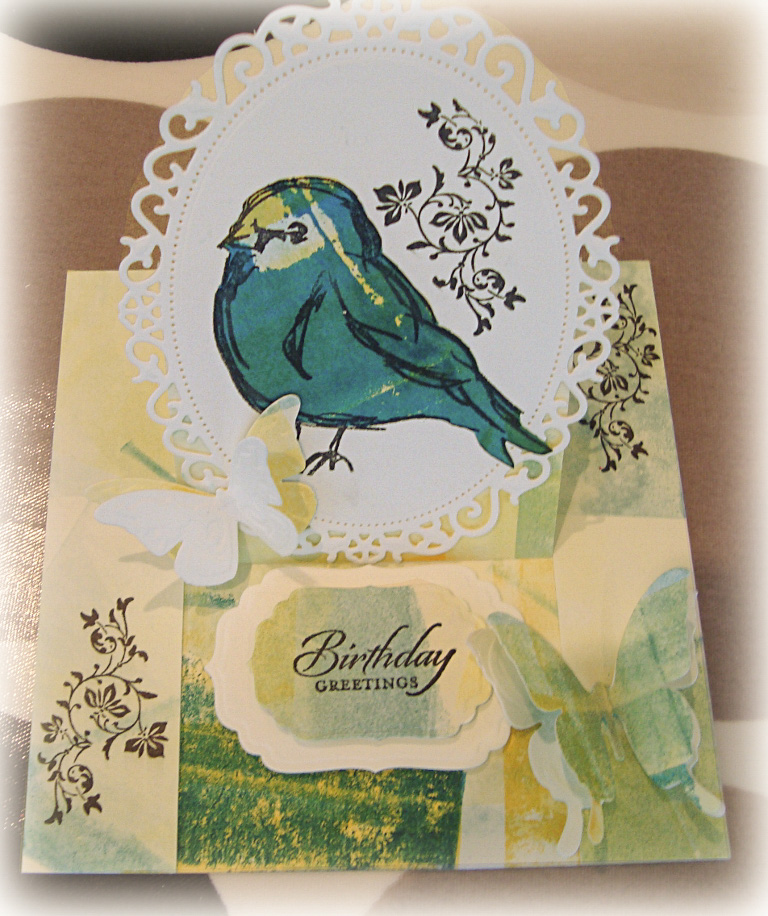
Lauren’s birthday card was already made by the time I set sail for Ally Pally but on discovering how she likes CAS I had to make another. Hope she likes it.
Used watercolour card and also watercolour paints to achieve the background effect plus the stamped sentiment (from Stampin Up) was done with black embossing powder.

Might as well show the two other cards which I created (not Lauren’s cup of tea methinks).
Did two because I wasn’t sure what colour she was into at the moment but it doesn’t really matter now as I won’t be sending either. DI inks were used to create the background plus various stamps.
Used two new dies that have been added to my collection recently and the picture stamps are an old set from Crafty Individuals.

It’s been extremely hard for Andrew and myself as all through the grandchildren’s lives we have lived abroad. Hence the reason for all the missing out on their growing up and the changing stages of their personalities.
Entering the Penny Black and More Challenge – Birthdays
There is definitely a twinkle in the eyes of those ladies as they look at Mr Handsome.
The ladies (which is a Hero Arts stamp) are stamped onto die cut tickets … not sure but I think the stamp is discontinued, you may still find it on e-bay.

Made the background with various stamps and white paint. Distress inks used are Broken China, Evergreen Bough and Stormy Sky.
Black Versafine was used for the main stamping and the sewing machine also made an appearance.


Uhhh Ohhh, today’s class is going to get messy and inky with this delicious looking door hanger.
Whilst mooching at the craft fair at Sandown Park Racecourse, I saw some grey board door hangers which I knew the girls would love to have a go at decorating so voila that’s exactly what we are doing today. The flowers and bird are very dimensional and I have used Pinflair glue to add height.

Stamps are from Stamping Up called Picture Perfect. Love these as they are a three step process to get the rose effect and I used three different coloured inks before cutting out. The cut out leaves are also a three step process stamp.
Mr Bird is a four step process to get his gorgeous look. For the background the script paper was mod podged onto the hanger then the edges were sanded for a smooth finish.
When stamping onto the script paper I used the Timeless Textures set (also an SU product) .
Now that stonkingly cute looking bird on the branch was created by using molding paste through an Imaginations Crafts stencil. When dry he was coloured with inks and white paint. White paint was also dabbed around the edges of the hanger.


Hope you enjoy this one girls x x
Entering for the Craft Stamper Take It Make It Challenge – TEXT ME
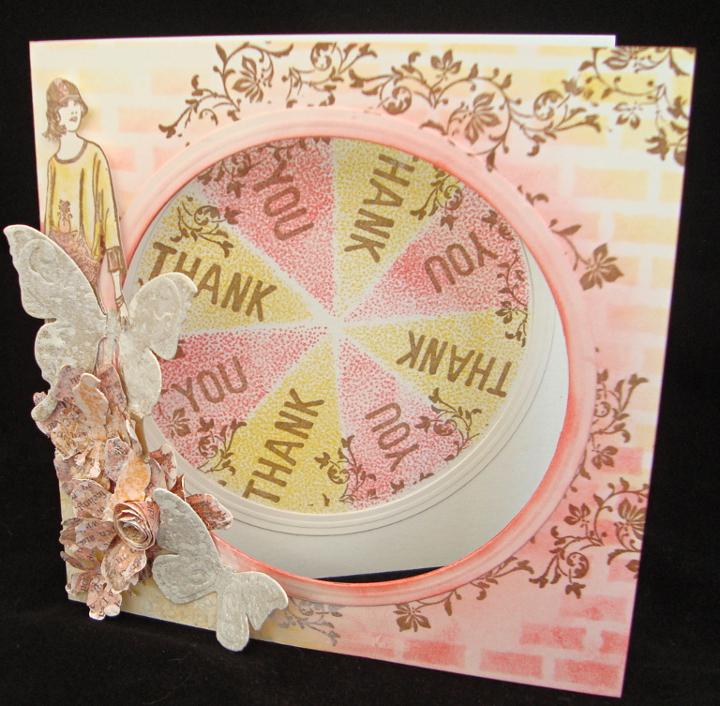
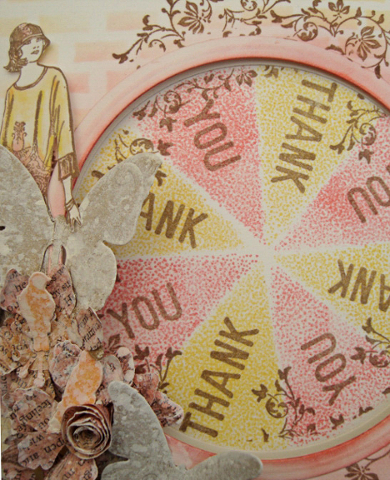
The first challenge of the New Year at FSC this month is ‘Thanks/Gratitude’. The lovely Esther picked the new theme.
Made my card along the same lines as my previous post.
The circle this time has been made using a different background stamp and only three colours are used. The words THANK YOU you are stamped over the top. A very pretty floral stamp from Stampin Up adds extra dimension over the inking and stenciling.
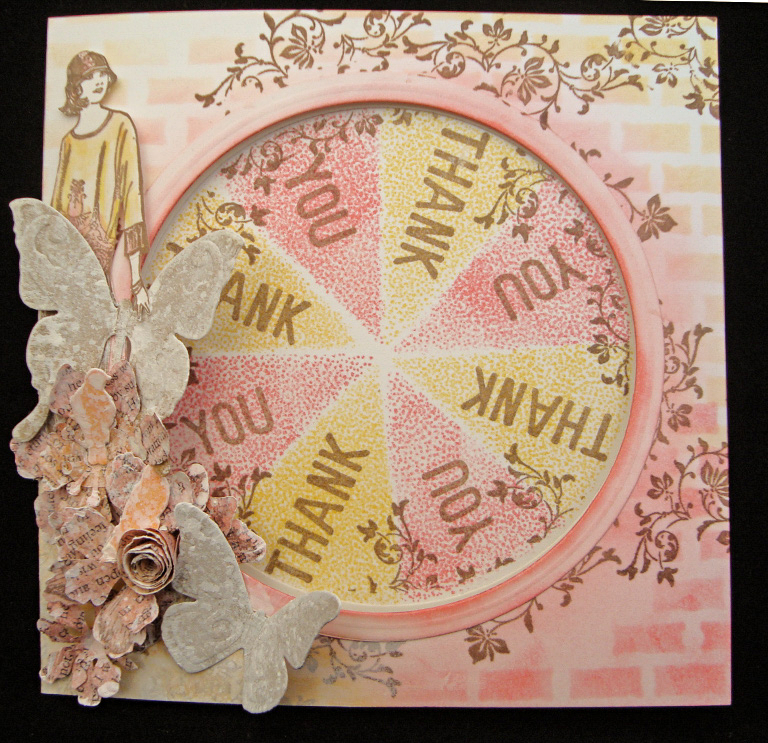
For the floral and butterfly corsage I added white acrylic paint to the tips. The butterflies were cut from kraft cardstock.
Next I masked off the whole of the card before spraying only the corsage with dylusions White Linen ink spray.

I would love it if you hopped on over to see all the DT’s work as they are simply stunning. Also don’t forget that the winner of this challenge has $20 to choose anything they like from Flonz’s store.
Wishing each and every one of you a Happy New Year.
Wow January – can you believe it!!!!
Feeling so refreshed and raring to go after having such a fabulous Christmas break with all the family. Can’t wait to hop around all your blogs to see the fabulous makes I have been missing.
Let’s go then and what better way to start this post than to show my first make of the year which is for … Vintage Stamping Challenges
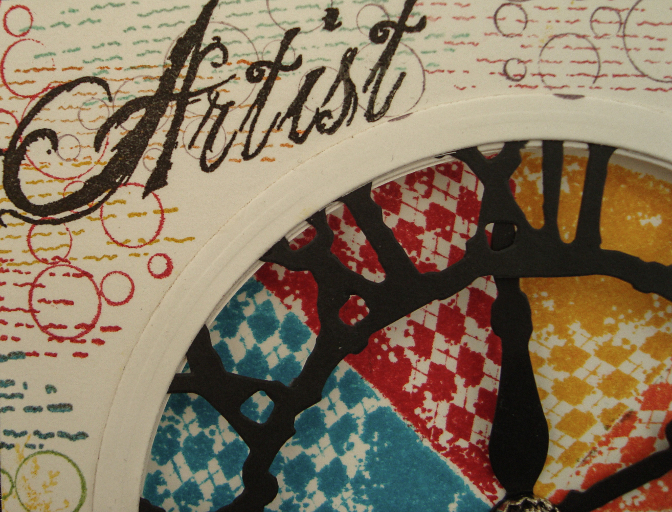
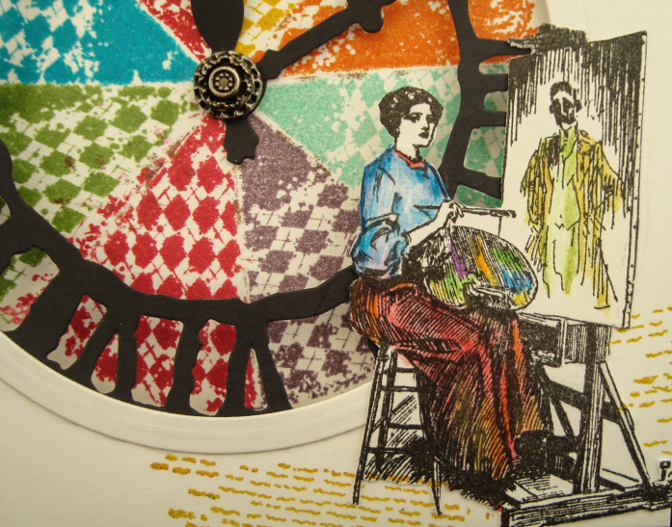
Their first challenge of 2016 is something very simple … Anything Goes With Your New Stash.
My new stash are some background stamps which I purchased real cheap over the Christmas period.

Winter is well and truly here with us so to give myself a real feel of warmth I made this card with some very vibrant colours.
Cut a circle aperture in the front before adding a clock die. When opened the inside of the card looks like this.

Toyed with adding numbers around the edge but I thought it might look t0o busy. All the inks used are from Stampin Up.
Added a stamped painter image which you can find here from Flonz’s store.
I really hope that you can join us for this month’s challenge. To enter just click Mr Linky at the bottom of the VSC web page and maybe it could be you who wins the $20 from Flonz’s store.
Please visit the DT’s blogs for more inspiration and also it would be nice to leave them some love.
Don’t you just love having birthdays? Doesn’t matter how old you are the excitement never goes away (well not for me anyways).
Not going to say how old I am today but not quite at the three score years and ten yet!!!
Sharing with you the class cards which we made yesterday.
Made our own backgrounds on the A4 cardstock by brayering and using three different coloured inks.

My fave card from this selection is the “Cheerio Chaps” but the Dina Wakley Scribbly Birds is a close second.


More photos but this time I am showing a beautiful make that I received from Irene and as you can see a few crafting goodies were also included in the parcel.
A huge thanks “I”.
I had a really fabulous pressie from Crafty Friend (crafting of course) and Andrew bought me a light box which I have been after for ages.
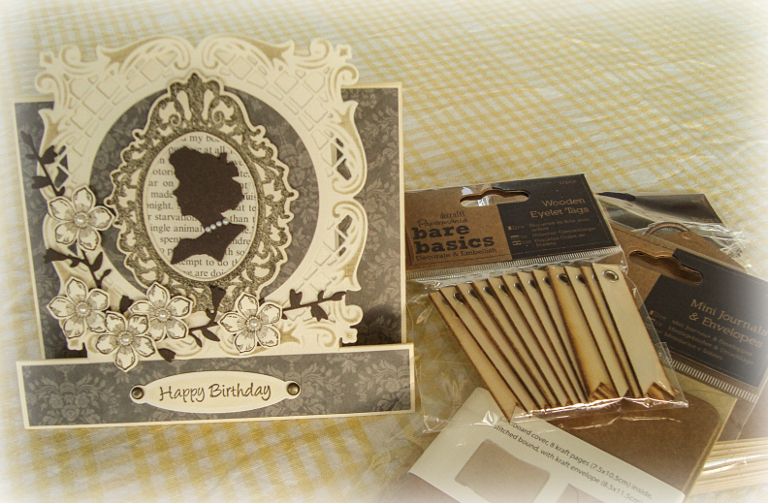
Here’s a picture of what I bought for myself … as you do!!!!

Below is a pic of New Phil’s card from the class yesterday (we call her that because there are two Phil’s)
Just had to take a photo because I loved the way her brayering on the card turned out. The bottom piece looks just like a grassy meadow scene.
Whilst posting my tag below I noticed I still had a post in draft. How different is this from the tag below!!!!
This is a card we made a few weeks back in the class and I forgot to post.
The flower head has been coloured in with acrylic paints but the stem and leaves have been left plain.

Everything about this is CAS plus all the stamps used are from Stampin Up.


Wife to Andrew (best hubby in the world), mother of 2 wonderful boys and hopefully the best grandma to three beautiful grandchildren, oh can't forget my other babies Penny Black & Chip!

