Log in |

Gentleman’s Pen Holder

How guilty do I feel today?  Andrew asked if he could take his pen holder to put on his desk today.

So where does the guilty feeling come from???  I made this 3 months ago and it has been sitting on my desk ever since.  I wouldn’t let hubby take to work until I had photographed it.

Well me and photo taking is still not a match made in heaven but how bad am I to make hubby wait this long?  Shame on ya girl!!!!

Andrew actually brought home the toilet rolls from work for me to make these crafting implement holders for my craft room.  You can see the first one here.

He really liked what I made so asked if I could make one for him.  Cock-a-hoop and thrilled to bits as this was the first thing he has asked me to make specially for him.

It turned out rather well and has the look of leather, just like those expensive pen holders on a Victorian gentleman’s desk.

All done and dusted hunny so you can have it to sit on your desk (sorry)!!!

Pen Holder 1Pen Holder 2Pen Holder 3

I have another one which I want to show as soon as I have taken the pics.

Do you remember Mr Key Box here, well he is nearly finished.  I found this key which I want to put on the front of the box but it needs two holes drilled into the wood and Andrew is waiting for me to tell him where the holes should be!!

Key 1Key

Shirl

Stepper Stairway Card

If you really want a card to stand out from all the rest on the mantelpiece then you couldn’t get better than this neat stepper stairway card.  Everything lays flat for posting and very easy to make.

My brother’s birthday is coming up soon and this is the card I have made for him.

Love the stamped cat he really has attitude and he couldn’t care less.

2567

Shirl

Glitz And Glamour At FSC

Welcome Everyone To FSC’s 100th Posting

What could be better than a Glitz And Glamour theme at FSC for their 100th posting and also a Blog Hop.

Please read the information carefully below because everyone who leaves a comment on each of the Design Team’s posts will be in with a chance of winning their inspirational make.

To celebrate our success and to say a huge thanks to each and everyone of you fashionable crafters for joining us each fortnight (many from the very first challenge) we are starting this auspicious occasion with a ‘Blog Hop’.  There will be prizes on offer to go along with this weeks theme which could only be …

‘Glitz & Glamour’

Even though this will be our first Blog Hop lots of you will already be familiar with the concept.  If not here’s how it works, start at FSC  click on the the first name and Hop to that blog and leave them a comment.  You keep hopping until you have left all the Design Team a comment.

Leaving them a comment is important as each DT member will be doing a draw from comments on their blog’s for the chance for you to win their fabulous inspirational make.  As well as one lucky winner receiving the €20 voucher to spend at our sponsor’s store.

If you have done everything right you have landed here to leave your comment and I am the last so no more hopping.  If you have lost your way you can always pop back to FSC and start over.

We have more news for you.

Also starting from today FSC is changing to monthly.  Each challenge will now be starting the second Sunday of the month.

 Time to have a look at what I have made for the 100th challenge and what you could possibly win.

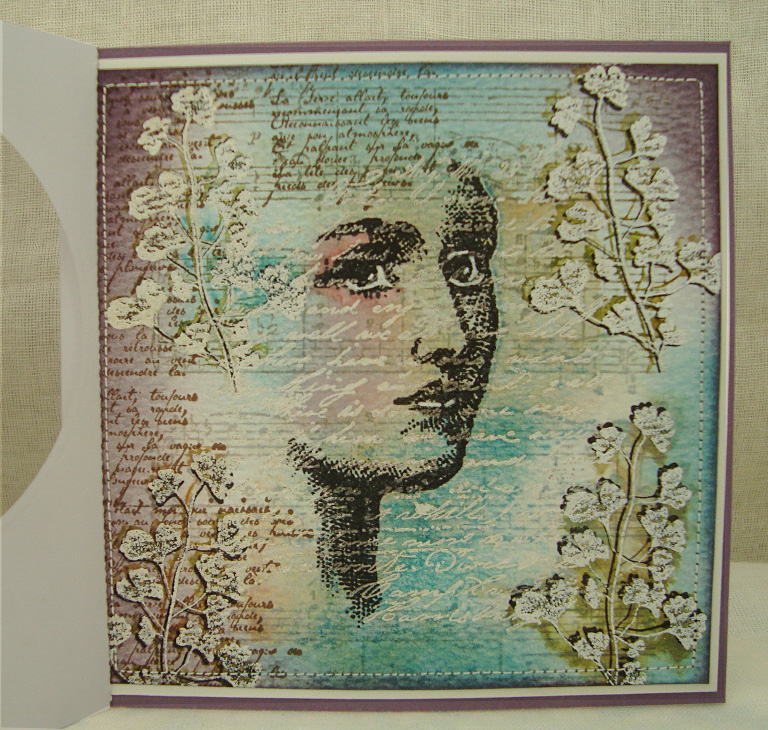
As you know I love making kinetic cards and this one is another of those.  When finished it fits into a DL envelope perfectly.  Used the same inks to colour her in as I did on the ladies.

It is a cascading card and is meant to make the Runway stamps look as if they are on a catwalk.  It kinda worked!!!  The front has this glamourous stamp which you can find here, used her on this card here and I loved her so much that I just knew she was going on the front of my make for this challenge.  Used the same inks to colour her in as I did on the stamped ladies.

Very photo heavy but I wanted to try and show the flowing element of the card.  Stood above the piece and took a photo which shows the layers better.

Glitz & Glamour 2Glitz & Glamour 3Glitz & Glamour 4Glitz & Glamour 5

Can you guess why there is not much inking around the edges?  It’s because the girls made this yesterday as their class make.

I can honestly say they loved making it but don’t worry I made sure they didn’t handle it as I wanted no inky smudges to spoil it.

Glitz & Glamour 6Glitz & Glamour 7Glitz & Glamour 8

Lastly here are the two back pages.  There is also a blank page behind the Paris image which I left deliberately because whoever wins this I will be writing a little something and signing it.  Good Luck everyone and you have one month so don’t forget to enter this challenge.

Glitz & Glamour 9Glitz & Glamour 10

I would love it if you hopped on over to see all the DT’s work as they are simply stunning.  Also don’t forget that the winner of this challenge has $20 to choose anything they like from Flonz’s store.

Shirl

Still In A Vibrant Mood

There is nothing better than waking up to wall to wall sunshine, your whole mood instantly changes and everything is right with the world.

Today I am showcasing a card that the girls made in the class on Saturday.  I made this card years ago (8 years or more) but didn’t like it very much because I thought it didn’t sit properly.  Recently came across my template and after a bit of tweaking I got it to stand properly.

The class actually made their own template of the card which they could take home and then they went on to make another which they decorated.

The difference with this week’s class was that they had no finished card to copy because I deliberately didn’t decorate mine.  I wanted to see them bouncing ideas off each other so gave them everything they needed to decorate and left them to it.  All went well and each card looked amazing.  They also made an envelope to match with the SU Envelope maker.  Love this piece of equipment.

Below is my finished make (vibrant again) which is laying flat ready to go into the envelope, hope the girls like it.  I think everything looks more professional when the envelope matches the card.

Interestingly enough not one of the girls got the inks out to do the edges.  Going to have to work on this in future classes.

Not sure what this card should be called but to me it looks like a topper in a box.

It pops into the envelope flat for posting but below you can see what it looks like when taken from the envelope and displayed for all to see.

02 Box Card3 Box Card

All stamps are from SU except for the dress stamp which is a very old wooden one from Hobby Art which I think is discontinued!!!  Paper pieced the dress and then lightly stamped over.

Shirl

Hot Sunny Colours

Cor blimey two posts in one day … what does that tell you peeps … Shirley is behind throwing because of the holiday.

This post comes with a  government health warning to wear your sun glasses as it is certainly hot sunny colours.

Below is my card for the Vintage Stamping Challenges and the theme this month was picked by the lovely Brenda.  I am sure that if she had known what the weather was going to be like she would have picked another theme.  It is blowing a gale here and the rain is soooo cold.

Finally got around to using my Spectrum Noir Aquatint Inks and I think you can guess that these colours are from the Brights set.  Inked the watercolour card first with #15 from the set, stamped the image with black Versafine before adding water to bleach out her skin.  Stamped her again onto patterned paper then cut out the parts I needed to paper piece her.

I picked this stamp here to use on my card from Flonz’s range of beautiful stamps.

I really hope that you can join us for this month’s challenge.  To enter just click Mr Linky at the bottom of the VSC web page and maybe it could be you who wins the $20 from Flonz’s store.

Please visit the DT’s blogs for more inspiration and also it would be nice to leave them some love.

Shirl

Up Up And Away

I have just come back from the most fabulous 10 day holiday where Irene, Paul, Andrew and myself toured around the West Coast of Ireland.

Started the trip by driving to the North, Portrush, where we visited the Giant’s Causeway then on to Sligo via Donegal.

We also stopped off at Mullaghmore … they had a little craft shop which was a surprise!!  We then made our way along the Wild Atlantic Way to Achill Island which is too stunning for words and stayed at the best B & B ever.  All the other stopovers were 4 star hotels but they weren’t a patch on the B & B.

Making our way down to Galway we just had to make a stop at Toormakeady where we visited the most fantastic craft shop called Create With Kate (the boys were very good about this) lol.  Kate made us soooo welcome with tea/coffee and cakes, fantastic.  I can highly recommend you visit Kate’s shop if you come to Ireland (and can find it!).

Next came Limerick but before then we visited the Cliffs Of Moher which were breathtaking, then made our way to Cork.  Before leaving Cork we visited Blarney Castle where Paul kissed the Blarney Stone but Irene chickened out.  Andrew and myself climbed all the way to the top of the castle but no way were we kissing the Blarney Stone!!!

We were so close to Tipperary (10 kilometers) but no time left to visit, this will be for another time.  On to Kilkenny then back home to Gorey.  Fabulous break.

Fashionable Stamping Challenges this fortnight has a theme of  ‘Person or Persons’    My lovely teamie sister Amanda chose this fantastic theme.

I would love it if you hopped on over to see all the DT’s work as they are simply stunning.  Also don’t forget that the winner of this challenge has $20 to choose anything they like from Flonz’s store.

Shirl

Old Favourites At FSC

Fashionable Stamping Challenges this fortnight has a theme of  ‘Old Favourites’    My lovely teamie sister Esther chose this fantastic theme.

“Oh the tales she could tell” …  about this card being made!!!!  All is revealed below.

She started life as just a square card but me being me thought it looked too boring.  Out came the sewing machine and I stitched all around the edge.

Still looked rather plain and as luck would have it I had a circular aperture card on my desk.

Made a score line down the left hand side of the card and folded back.  Then I glued the stitched card to the inside of the aperture card.  Next I stitched everything together along the score line … still with me ???

All started to look better especially when I stamped the flower and quote on the front.  Voila, all done.

I also have a little tale to tell about the old favourite stamp used.  It is one of my all time favourite stamps called Isobelle from Inkylicious.

Technically this is a new stamp which I recently bought at Ally Pally … ahhh … but I had this stamp years ago and whilst taking it out of the packaging it ripped on me.  Now, because I loved it soooo much I re-bought it.

So even though this one is new I did have the other stamp a good few years before it ripped.  Another reason why I am not keen on acrylic stamps.

The last time I used the stamp was here 17th January 2014 when I made a Nuts & Bolts Album.

134

Stamping, embossing plus inking makes for a very enjoyable time. Hope you love it as much as the fun I had making.

I would love it if you hopped on over to see all the DT’s work as they are simply stunning.  Also don’t forget that the winner of this challenge has $20 to choose anything they like from Flonz’s store.

Shirl

First Installment Of Breathing New Life Into Mr Key Box

Andrew has just painted the utility room (with boring ole Magnolia) but it looks clean and fresh once again.  Thanks hunny bunny you’re my hero.

This room is home to Mr Key Box but no way was I going to put him back on the wall because he was looking so tired and worn (well he is 13 years old).  Mr KB is a bog standard pine box with absolutely nothing going for him.  Decided he really needed a new lease of life so this is how he is looking so far.

Sorry folks I forgot to take a photo of him when he was in his boring pine state.

#1 pic – is at the stage when I had painted him all over with Magnolia.

#2 pic – shows the inside which used to have a piece of orange corrugated cardboard stuck to it.  That just had to go!!!

#3 pic – is where you can just see the crackle is starting to form.

Key Box 1Key Box 2Key Box 3

Onto the exciting part.  Bought a new rusting product from C & C which Ali Reeve from Stamps Away demonstrated  … just had to have it.  First time of using and oh wow what can I say … fantabulous or what!!!  No more using umpteen types of paint to get that rusted look this is so much quicker.

#1 pic – shows some cut grey board keys and a lock from TH Hardware Findings.  Cut each key twice then glued together to give added depth but the lock was cut three times then glued together.

#2 pic – shows the keys and lock with the grey powder on them.  What you do is dab a little of the acrylic wax onto the items then throw on the powder.

#3 pic – this is the fun bit you spray over with white vinegar (or water if you prefer) then watch the magic start to happen.

#4 pic – wow the magic is starting and it looks amazing when it’s dry.

Next installment of Mr KB will be coming to you soon!!!!

KeysKeys 1Keys 2Keys 3_edited

Shirl

Inky And Messy One Layer Card

This mornings class really sizzled, everyone worked so hard with their cards plus I remembered the rubber gloves as we all got messy, painty and inky.

The card in yesterdays post here is the fist card the girls made today but because I had already made it I used different DI colours when I demonstrated the techniques to them.  Colours used this time round are Weathered Wood, Bundled Sage, Dried Marigold and Peacock Feathers.

Finished it off with different stamps after the girls had gone home.  These were Indigo Blu again but from two different sets.  First is called ‘Live Laugh Love’ and the second ‘Blazing Poppies‘.  The sentiment is from Stampin Up.

The second card was all about the background really.  Started with Gesso, bookprint and chalk paint on plain white cardstock.  We also stamped with the paint before blending over with DI’s.

Whilst doing the first background we made a second so we could punch out the flowers and leaves with everything matching the layer behind.  Stamped the sentiment onto Vellum with black Versafine before adding clear embossing powder and then ripped to fit.

TimeTime1

Entering the first card into the Indigo Blu Challenge – Just One Layer
Craft Stamper Take It Make Challenge – Take A Stamp

Shirl

Just A Hint Of Gold

Gold embossing is not usually for me but this card was crying out for just a teensy bit of glamour.

Another buy from Ally Pally are these three stamps from Indigo Blu, one called Ink Splat Butterfly and the other two, which I have been after for ages, are called Bubbles Background and Crackle Glaze.

Picked Raspberry, Seedless Preserves, Dusty Concord and Shaded Lilac are the DI colours used for the background of my card.

Stamped the butterfly with Versamark then added white embossing powder before stamping the Bubbles with Black Versafine and the Crackle Glaze with Picked Raspberry.  Made sure everything was dry then over stamped the white embossed butterfly again but this time with the black Versafine ink making sure the image was off centre just a fraction before adding clear embossing powder.  Lastly the lines were stamped with Versamark and gold embossing powder added.

Entering for the Indigo Blu Challenge#27 – Just One Layer

Shirl